It seems that every time I have time to blog, I'm unable to get the associated photos/setups to support the article.
Here is what I've been up to:
Trip to Florida to film a segment of the watershed documentary.
Trip to Utah to film a technology classroom case study.
Multiple proposals (and subsequent multiple meetings)
A few smaller projects - a photo shoot BTS, a corporate annual event BTS
So stay tuned, I've a couple articles up my sleeve for the coming weeks.
(no I haven't slowed down, just making time)

Thursday, April 25, 2013
Friday, February 8, 2013
Same Old Thing
I often dislike using photographs in my work.
I love photography, I just usually dislike the jarring effect that happens when you go from motion picture to stills in the same piece.
And at the risk of sounding like a curmudgeon, I must say I am starting to get tired of the ever increasing WOW factor that is being used in AE to make photos 'pop.' And of which I am slightly guilty as well. Swooshes, keyframed everything, grungy overlays. (I thought we left that 10 years ago, it was called 'edgy.')
Now, the average viewer couldn't give two cents what method you use so long as the content, also known as the story arc, is supplemented not supplanted.
SO when I started a project that all B-roll would be stills I thought long and hard about what I could do to make this interesting (for me.) Thankfully the photographer knew her business, so I had a wonderful selection.
I decided to take a step back in time and do my own version of a Rostrum setup. Granted it's a tad cheese, and I'm moving the camera not the table, but the effect is similar.

Now, you may be thinking, "just use the 'Ken Burns' plugin," or, "Buy a template for AE that you can drop your digital photos in." I assure you that would work, and I have done that in the past.
I didn't want to. For one thing, I wanted to do it in camera for a change. Another reason, those templates in AE are just plain awful. NO you don't fool anyone that your photographs are actually on a light table, on a clothesline or in a dusty old leather book.
Granted I had to print out 180+ photos for this 2 minute piece, BUT not only am I more satisfied with the results as a cameraman, I'm more satisfied with the aid it gives to the story arc.


I'll be doing this for the rest of the series of shorts I am working on for this project, and I may even default to this as my preferred method of using stills.
A bit old fashioned, but those early filmmakers kinda knew what they were doing.
At least I didn't try a multipane camera.
UPDATE: FINISHED FILM
Friday, February 1, 2013
Shine a light (or two)
I love my light meter.

I'll give a quick example.
Suppose you want to set up a reverse key interview:

Notice my 1k (key) is behind the subject and the 500 (fill) is in front. The bounce is to both flag the light from the huge office window and to bounce a little bit of the fill around the face to give an evenness to the lighting. If my shadows were not strong enough, I'd use black.
Here is my front (fill) meter reading

Here is my rear (key) meter reading

That's a good ratio for what I'm after, if you wanted a stronger ratio, you could dial back the fill, or dial up the key. Here is the result, featuring yours truly:

Now, what you can't see in this iphone pic is that the key side of my face is actually properly exposed (I set the aperture at f4) The iPhone boosted the exposure making it look like the key was too bright.
I set the lights with the meter, then turned on the camera and took this. No wasted time using a histogram to try to interpret what my key f stop should be. No guessing that the LCD is showing me accurate luminance.
Use a meter! (When you can.)
p
Friday, January 25, 2013
Optical Magic
I'm at the tail end of GenX, or the beginning of GenY.
Which makes me a bit of a skeptical optimist. Confused? Me too, but thats a different post.
So when I read a headline like this:
Increase your FOV to full-frame, increase your lenses aperture rating by 1 full stop!!!
I'm conflicted, I want to believe in the possibility. But I'm putting on my skeptic self.
So I ordered one. It arrived today.
Let's be clear. I have the original EF-E mount from Metabones and it works fine. No, the electronics don't work on the my FS700, but my workhorse lens the Tokina (Angenieux) 28-70 2.8 (2.6 really) is full manual. My other lenses are all EF mounts, and while Image Stabilization would be great, only one of them has it. So I'm not missing much, I adjust exposure by ND/ISO.
Metabones also has really built a reputation for quality kit, and is really the only "smart" adapter that is a simple integrated solution. So, I can't see them selling a COMPLETE gimmick.
So if the one I have works so great why would I look at the other side of the fence? Basically two reasons:
So on to the meat of this post. Impressions:
Build quality much improved over V1 which was good. Solid camera and lens connections. Electronics work no problem.
I took four clips, 17mm and 70mm with the Speedbooster and the V1 adapter.
The 17mm REALLY surprised me. I mean look at the difference between these two! There is a bit of CA/Flare on the completely blown window at 17mm, but that is to be expected with that much of an overexposed area. You can also start to see the filter holders from the mattebox on the 17mm with the speedbooster.
On the 70mm focal length I couldn't remember whether I focused on the chair or the wall with the V1 adapter, and I guessed wrong. The exposure difference isn't as pronounced on the 28-70 as it is on the 17-40, not sure why. It is there, it is brighter, but not as much as with the wider angle lens.
I don't see any new ghosting or flares introduced from the additional optics either.
Here are some stills of my false colors on the monitor.


So, I haven't done (and probably won't do) any resolution testing or formal A vs B testing. I don't see any red flags, so why should I? It does what I wanted it to do. The light increase and -maybe- sharper image are bonus features for me. My IS works, my 28-70 is usable for landscape, the 17-40 is even better for interiors, my 24-105 is a GREAT walkabout lens now....
Good job Metabones team! I guess the GenY is coming out right now. My GenX side is feeling restless and seeking something to be cynical about. Maybe peruse The Onion for 10 min.
p
Which makes me a bit of a skeptical optimist. Confused? Me too, but thats a different post.
So when I read a headline like this:
Increase your FOV to full-frame, increase your lenses aperture rating by 1 full stop!!!
I'm conflicted, I want to believe in the possibility. But I'm putting on my skeptic self.
So I ordered one. It arrived today.
Let's be clear. I have the original EF-E mount from Metabones and it works fine. No, the electronics don't work on the my FS700, but my workhorse lens the Tokina (Angenieux) 28-70 2.8 (2.6 really) is full manual. My other lenses are all EF mounts, and while Image Stabilization would be great, only one of them has it. So I'm not missing much, I adjust exposure by ND/ISO.
Metabones also has really built a reputation for quality kit, and is really the only "smart" adapter that is a simple integrated solution. So, I can't see them selling a COMPLETE gimmick.
So if the one I have works so great why would I look at the other side of the fence? Basically two reasons:
- Focal Length. On the 28-70, 28 really isn't wide on s35. Almost every time I use it I wish the wide end was 4-6mm wider. This stinks when shooting outdoors in winter, because I'm NOT going to change lenses when it's blowing snow, and I'm NOT walking back a half mile to the car. I usually end up using just my 17-40mm and hope I can get close enough at the 40mm end of it for those nice isolating shots. PLUS the 17mm becomes a true wide angle for architectural shots.
- Travel. When I take a couple of my upcoming trips space/weight will be of utmost importance. I plan on stripping the cam down to barebones and bringing 1 lens (OK maybe 2) No support rails, no mattebox, no extra handles, no external monitor. Lavs, shotgun, camera/lens, monopod, hihat. that's it. SO Image Stabilisation just took a big jump in importance. I'll be able to leave home with fewer lenses. (Just use the old adapter to get closer if needed.)
So on to the meat of this post. Impressions:
Build quality much improved over V1 which was good. Solid camera and lens connections. Electronics work no problem.
I took four clips, 17mm and 70mm with the Speedbooster and the V1 adapter.
The 17mm REALLY surprised me. I mean look at the difference between these two! There is a bit of CA/Flare on the completely blown window at 17mm, but that is to be expected with that much of an overexposed area. You can also start to see the filter holders from the mattebox on the 17mm with the speedbooster.
On the 70mm focal length I couldn't remember whether I focused on the chair or the wall with the V1 adapter, and I guessed wrong. The exposure difference isn't as pronounced on the 28-70 as it is on the 17-40, not sure why. It is there, it is brighter, but not as much as with the wider angle lens.
I don't see any new ghosting or flares introduced from the additional optics either.
Here are some stills of my false colors on the monitor.

17mm f4 (2.8 equiv.) with speedbooster, 320ISO, ND clear

17mm f4 with V1 adapter, 320ISO, ND clear

70mm f 2.8 (2.0 equiv.) with speedbooster, 320ISO, ND 1/4

70mm f 2.8 with V1 adapter, 320ISO, ND 1/4
So, I haven't done (and probably won't do) any resolution testing or formal A vs B testing. I don't see any red flags, so why should I? It does what I wanted it to do. The light increase and -maybe- sharper image are bonus features for me. My IS works, my 28-70 is usable for landscape, the 17-40 is even better for interiors, my 24-105 is a GREAT walkabout lens now....
Good job Metabones team! I guess the GenY is coming out right now. My GenX side is feeling restless and seeking something to be cynical about. Maybe peruse The Onion for 10 min.
p
Wednesday, January 23, 2013
If you want something done
I'm an optimist when it comes to DIY projects. Unfortunately that optimism usually fades as I actually engage in said projects.
In my early years as a freelancer I had to DIY equipment because, well, I couldn't buy a jib or lights. I was a newbie that had not a clue about the advantages of rental houses either. So most of my projects were lame attempts to construct something functional so I could get the shots I wanted, without looking like either an erector set or like a 5th grade Rube Goldberg job.
In the end, I discovered that renting equipment was a WAY better option. Sure it can be expensive, but how much time (and money) did I waste on DIY jobs that work only for a couple shoots before they start needing "maintenance."
Now I'm not knocking people who choose to DIY. Like me back in the day, they may not have the funds to purchase or even rent proper gear. If you are just starting out it's hard to drop $500 on ONE light fixture or slider. (Especially when your old veriflex skateboard from the 1980's is sitting in your basement.) It is also sometimes hard to get clients to pay for gear rental. Remember when you start out, you are usually scraping for work, ANY work, to get by. That usually means low paying clients that want the moon for the cost of bus fare.
What I am saying is that when it comes to camera gear, I dislike doing it myself. Good quality, well made gear that is thought out from a users perspective is usually worth whatever the company is charging for it.
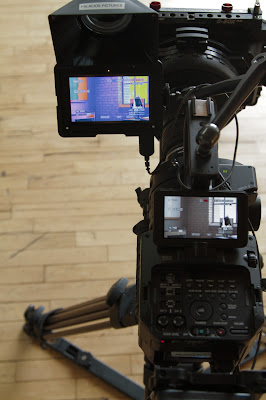
Which is why when I realized my O'Connor O-Box has no matte inserts available as an accessory I was rather annoyed. O'Connor makes some very nice gear and I have a lot of confidence its ergonomics and longevity. But I find myself needing some sort of matte insert to help control flare. I work a lot of 1-man-crew type of jobs and having two more (or three if there is a lot of reflection from below the camera) flags to attach to the box would slow me down more than I'd like.
After much searching and posting on forums no one could point me to a commercially available matte insert.
What to do...
DIY.I hate DIY. I was not looking forward to a DIY solution for this. The O-Box is a well made mattebox and here I am, going to add something to it that in no way can match the fit/finish. BUT I needed this solution and necessity is ____________ and after all, it has to be better than the gaff tape I would use occasionally.
So here we go, after commandeering my wife's sewing machine, my solution:


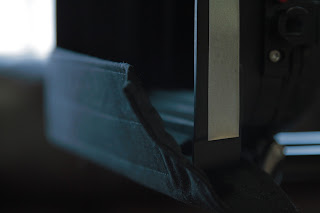
I used tabs of velcro to loosely hold the flexible ends of the matte to the flag and the bottom of the box.
I think it turned out OK, not an ideal solution. But the only one available to me. Also, the fit/finish isn't perfect, but it's a lot better than I dared hope. I do still need to figure out the sides. I considered velcro, but I want it to be easier to adjust, and I don't want to re-make the mattes just to include more magnets. I'm still thinking on it....

In my early years as a freelancer I had to DIY equipment because, well, I couldn't buy a jib or lights. I was a newbie that had not a clue about the advantages of rental houses either. So most of my projects were lame attempts to construct something functional so I could get the shots I wanted, without looking like either an erector set or like a 5th grade Rube Goldberg job.
In the end, I discovered that renting equipment was a WAY better option. Sure it can be expensive, but how much time (and money) did I waste on DIY jobs that work only for a couple shoots before they start needing "maintenance."
Now I'm not knocking people who choose to DIY. Like me back in the day, they may not have the funds to purchase or even rent proper gear. If you are just starting out it's hard to drop $500 on ONE light fixture or slider. (Especially when your old veriflex skateboard from the 1980's is sitting in your basement.) It is also sometimes hard to get clients to pay for gear rental. Remember when you start out, you are usually scraping for work, ANY work, to get by. That usually means low paying clients that want the moon for the cost of bus fare.
What I am saying is that when it comes to camera gear, I dislike doing it myself. Good quality, well made gear that is thought out from a users perspective is usually worth whatever the company is charging for it.
Which is why when I realized my O'Connor O-Box has no matte inserts available as an accessory I was rather annoyed. O'Connor makes some very nice gear and I have a lot of confidence its ergonomics and longevity. But I find myself needing some sort of matte insert to help control flare. I work a lot of 1-man-crew type of jobs and having two more (or three if there is a lot of reflection from below the camera) flags to attach to the box would slow me down more than I'd like.
After much searching and posting on forums no one could point me to a commercially available matte insert.
What to do...
DIY.
So here we go, after commandeering my wife's sewing machine, my solution:

As you can see, I took a little bit of a less complicated route than making actual inserts.
I used strong magnets sewn into the matte and attached a strip of steel to the sides of the box to make the matte not only quickly added and removed, but adjustable too. Long lens? slide the mattes together. Wide? slide them apart. Super wide? take them off.


I used tabs of velcro to loosely hold the flexible ends of the matte to the flag and the bottom of the box.
I think it turned out OK, not an ideal solution. But the only one available to me. Also, the fit/finish isn't perfect, but it's a lot better than I dared hope. I do still need to figure out the sides. I considered velcro, but I want it to be easier to adjust, and I don't want to re-make the mattes just to include more magnets. I'm still thinking on it....


So, has my attitude towards DIY changed? Not a whole lot. I'd much rather have purchased something effective. I've spent a few hours on it already and I can't invoice myself. BUT if you can't find what you are looking for, or can't afford it if you do find it, DIY away my friend.
p
Subscribe to:
Posts (Atom)